Hummingbirds are known for their tiny size, dazzling iridescent plumage, and agile flight. They are fascinating subjects for artists of all ages.
But most of the time, especially beginner artists, are not quite sure where to begin. Here are guides ranging from easy to advanced, from just simple sketches to detailed drawings on how to draw them accompanied by pictures.
The Easiest Way To Draw A Hummingbird
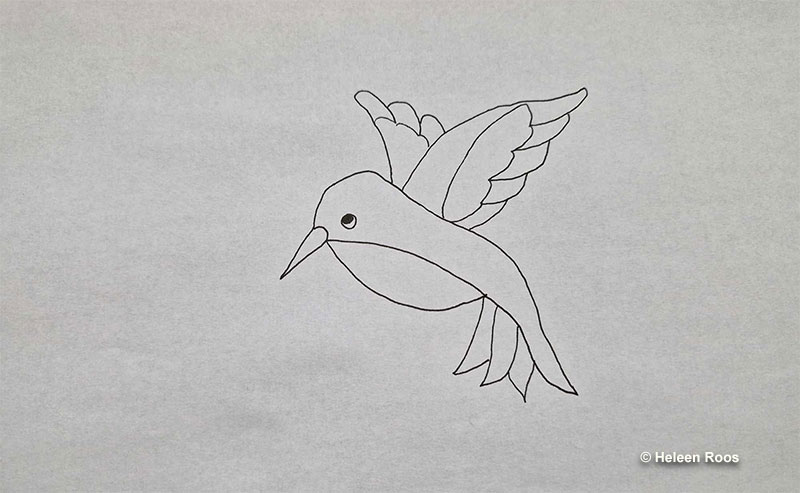
Start by drawing the bill. Decide on its length and shape. Next, it’s time to move to the body –create the head-back shape. Trace a curved line from the top of the bill’s base to form the outline of the head. Extend this line downwards to outline the back of the bird, ending at the beginning of the tail.
In order to draw the belly, start at the bottom of the bill’s base. From there, draw a curved line extending outwards to create the outer edge of the belly. Next, draw another curved line from the same starting point, connecting it with the lower tip of the first line to complete the belly shape.
To outline the tail, extend lines that form the back and belly of the bird to create the tail. Add additional lines to create individual tail feathers.
Sketch the wings and draw the basic outline of the wings, considering the bird’s posture. Include the outline of the flight feathers along the wings. To finish things off, add the eye.
You may make it more detailed, color it, or make any modifications you feel like.
Interested in more options? We have a full guide to draw different birds!
Intermediate Designs
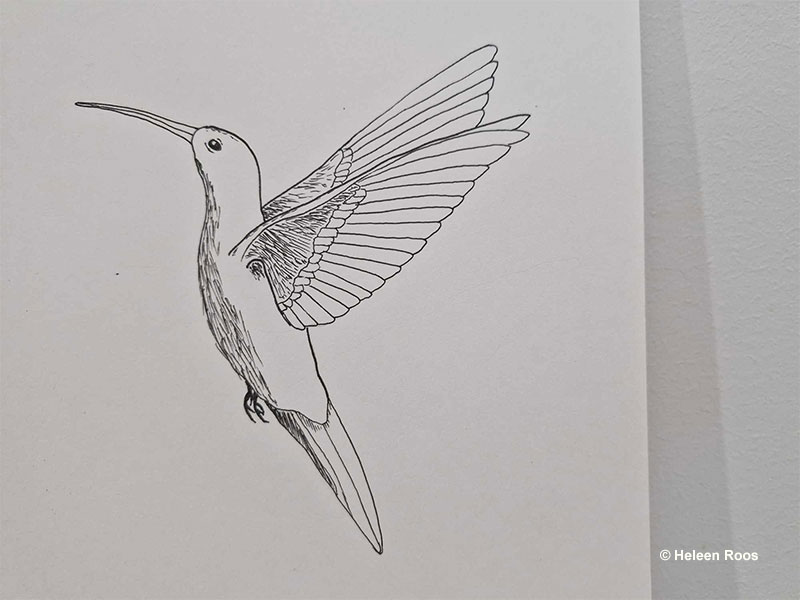
Moving on to more advanced designs, the basics stay the same – to start things off, outline the basic shapes. Start by drawing the shapes to outline the head, neck, and torso of the bird. This establishes the overall body structure and proportions.
From there, you can start adding features. Include the bill, eye, and outline of the tail with basic shapes.
Related: What do hummingbirds symbolize?
Next up are the wings; sketch the outlines of the wings, positioning them appropriately on the bird’s body. Once you’re happy with the shape and position, draw them over however you’d like.
This design includes more details, but start with the bill and tail. Incorporate specific features such as texture, shape, shade, and distinctive markings to add more definition. From there, you can go back to the wings – draw individual flight feathers and detail the wing linings. Pay attention to the shape of the feathers and the overall placement.
This is optional, but you can also add face and throat patterns to give the drawing more character.
To finish things off, you can add shadows and textures. Enhance the drawing by shading areas such as the belly, bottom of the tail, and wing linings to create depth. Use individual strokes to create texture.
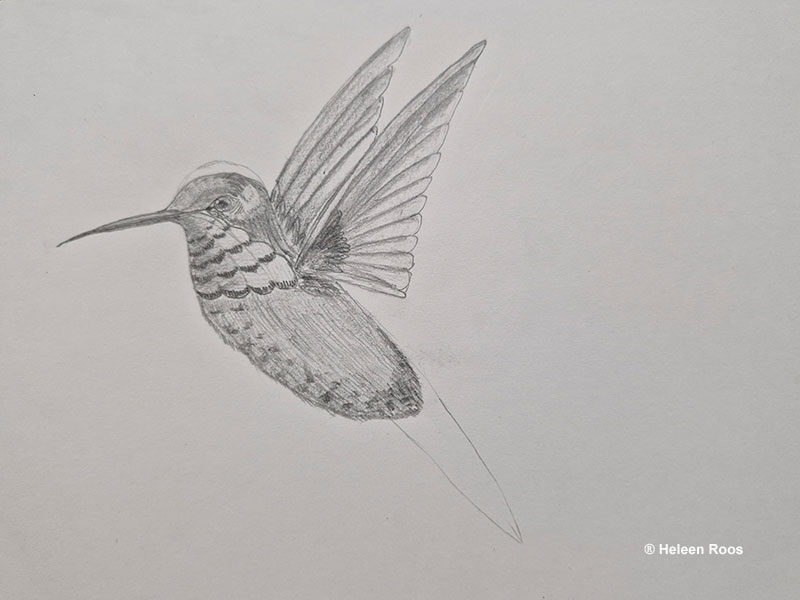
Advanced Hummingbird Drawings
Create the basic shape
Moving on to more advanced designs, begin with a small circle to outline the head shape. Inside the head circle, sketch a smaller circle for the eye.
From there, you can establish the bird’s posture and length. From the center of the eye, draw a straight diagonal line extending down to the right. This line represents the bird’s body posture and tail direction and the tip of it is also the tip of the tail.
Draw the front end of the body starting from the left lower side of the head circle. Create a rounded line that curves and ends towards the bottom right side near the lower end of the straight body line.
For the bill, draw a straight line from the bottom of the eye towards the left. The end of it is the tip of the bill. Then, extend another line from the tip of the bill slightly upwards, ending at the head circle.
To create the neck, draw a horizontal line from the chest to the long body line. Next, draw a slightly slanted vertical line from the right side of the head circle to meet the horizontal line at the body line. This forms the neck shape.

Moving on to the back and tail, move slightly up the right neckline and draw a line roughly parallel to the body line to create the back. Taper this line towards the end to meet the end of the body line to create the tail. Add a line to the bottom of the tail to create thickness.
Now on to the wings. Start at the point where the neckline meets the body line. Draw a diagonal line up to the right. From the same point, draw a shorter line fairly horizontally and connect the tips of the two lines to form a triangular wing shape.
For the rear wing, start from around where the head circle meets the top of the neck line. Repeat the previous step and follow the angles of the other wing. Keep in mind to keep this wing outline ‘behind’ other lines to create perspective.
Erase some unnecessary guidelines, including the bottom half of the head circle and the central body line.
Make some adjustments and refine where needed – connect the bottom of the bill to the eye with a slightly curved line, then continue it down towards the back of the head and back. Add a slight curve to the horizontal neck line for a more natural look. Refine the wing shapes by adding slight bends to both sides of the wing. Erase any remaining guidelines that are no longer needed.
Drawing the head
When it comes to the head, you can start by adding a thin, defining line around the eyes to emphasize their shape. From there, you can start detailing the eye. Outline the eye circle and add a small circle highlight at the top left of the eye and a smaller highlight at the bottom. Trace the outline of the pupil, allowing it to go behind the highlights, and color it dark. Lightly shade the iris, leaving highlights untouched.
Give shape to the area around the eyes and lightly shade the inside. Darken the left-side corner of the eye trim and blend it out towards the eye.
Work your way from the tip of the left tip of the eye towards the bill. Outline the outside of the bill and shade the inside. Leave a faint highlight along the top end of the bill.
Readjust the height and shape of the head, if needed, bringing the top of the head lower than the original circle. Round out the throat and the neck. Add some small curves along the horizontal neck line to give the impression of feathers.
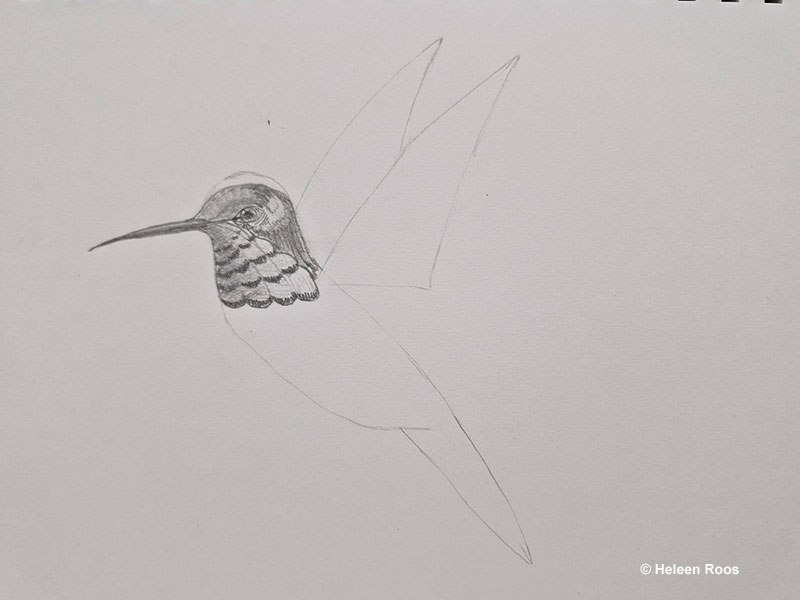
To shade the head, use horizontal pencil strokes below the bill, gradually fading as you move downward. Lightly shade the top of the head with short lines, continuing down the back of the head.
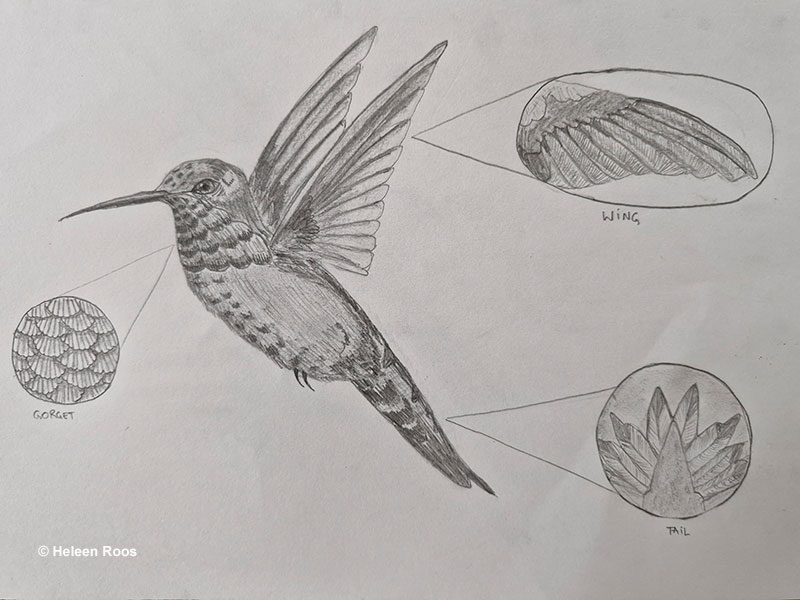
Refine the edge of the neck feathers along the bottom. Add the outline of the gorget by working your way up and left to the left tip of the eye. Add a little bit of texture across the back of the head in short lines. Darken the back of the head with those same short lines.
Add some texture to the feathers below the eye and at the top of the head, following the shape of the head with your pencil strokes.
From each of the upper points of the neck feather curves, trace a slightly curved line up and left towards the bill to create sections. Shade in the bottom of the neck with vertical strokes. To create the illusion of individual feathers, draw light curves along each section. Darken these curves to add shadow and depth, refining with darker, more distinguishable strokes.
Darken the shadow on the throat, add a slight shade around the top of the eye, and use detailed and darker strokes to bring out individual feathers.
Drawing the wings

Moving on to the wings, begin by outlining the front wing. Work your way around the wing, lightly curving the bottom right corner of the wing towards the body. Lightly shade the inside of the wing.
To create a shadow, add a ridge along the top of the wing with the edge of your pencil and fade it out gently.
Outline the rear wing, slightly rounding the tip. Lightly shade the entire wing with the edge of your pencil. Add shadow towards the bottom of the wing to give it depth and dimension.
To detail the wings, separate each of the feathers following the curve of the wing. Repeat on both wings.
Go back over the wings and feathers to refine their shapes. Round out the tips of the feathers to give a softer appearance. Create wing linings to the shadowed parts of the wings. Add shadows and shading to individual feathers for realism and depth.
Drawing the body
Begin by outlining and shaping the body. Use light diagonal shading to separate the body from the tail, moving upwards towards the wings. Lightly shade the inside of the body to indicate volume and form.
Add a little bit of fur texture along the outside of the body with the tip of your pencil with the fur going outwards. Pull it up and in from the edge of the body near the tail.
Darken up the bottom edge of the body using vertical strokes. Lightly fade it out. Create a shadow underneath the wing with horizontal strokes.
Use the side of your pencil to add texture to the inside of the body. Create small curves to simulate the appearance of feathers, applying slightly heavier pressure along the bottom of the body.
Across the body, draw short vertical to diagonal lines with the tip of your pencil. Begin across the bottom of the neck and continue down the body. Add darker horizontal lines around the ‘armpit’ area to blend the wing seamlessly into the body.
Drawing the tail
Trace out the back, going out towards the tail. Give the tail a little bit of a bend along the bottom. Take it back in and separate sections of the tail.
Lightly shade in the whole tail. Give the upper part some darker shading. Darken the end of the tail and feather it in with the edge of your pencil. Add strong lines along the tail.
Final touches
To finish things off, go back to the bird’s head. Darken the pupil and blend in the iris to enhance depth and realism. Increase contrasts around the eye area to make it stand out. Darken the tip and lower mandible of the bill for definition. Add short groups of feathers along the head for texture and detail. Darken the throat feathers. Take your time to refine edges, creases, and shapes.
You can add additional shadows to the wings and increase contrast along the flight feathers to emphasize their structure and depth. Pay attention to light and shadow to create a sense of dimensionality within the wing.
When it comes to the body, darken the lower side of the belly to add volume and definition. Refine the feather groups across the body to ensure a natural look.
Add small claws along the bottom of the bird’s body to complete it.
Some Tips To Keep In Mind
- Take time to study the anatomy of hummingbirds, especially if you have a specific species in mind. Understand their body proportions, wing shapes, bill length and shape, and the unique patterns of their plumage.
- Use reference images to guide you. Pay attention to details like feather texture, color transitions, and the bird’s posture.
- Before diving into details, establish the correct proportions and scale of the hummingbird. Use light pencil sketches to outline the overall body shape, wingspan, and placement of features like the eyes, bill, and tail. Correct proportions are key to achieving a convincing drawing.
- Begin by sketching basic shapes and lines to lay out the structure of the hummingbird. Use circles, ovals, straight lines, triangles, and others to create a proper framework.
- Explore different drawing tools and techniques to achieve various textures and effects. Use fine-tipped pencils for intricate details, and experiment with shading techniques like hatching, cross-hatching, or stippling to create depth and dimension.
- Drawing takes practice, especially when aiming for realism. Be patient with yourself and embrace the learning process. If a drawing doesn’t turn out as expected, use it as an opportunity to learn and improve. Keep practicing regularly to hone your skills and develop your own artistic style.