
Birds have long captivated the eyes of artists, also awakening the artist within each of us who yearns to capture their essence on paper. Yet, translating these creatures onto canvas isn’t always as simple as we wish.
Here, we offer step-by-step guides accompanied by visual aids on drawing flying birds, eagles, doves, owls, and more, making the process a bit more accessible and enjoyable.
The Simple Way To Draw Birds
Drawing a bid does not have to be complicated – by breaking down the bird’s form into basic shapes and focusing on key features, you can quickly create a charming representation of our feathery friends. The following sketch is not specific to any species (although they may resemble some) and is more of a general guideline on how to draw a bird quickly and simply.
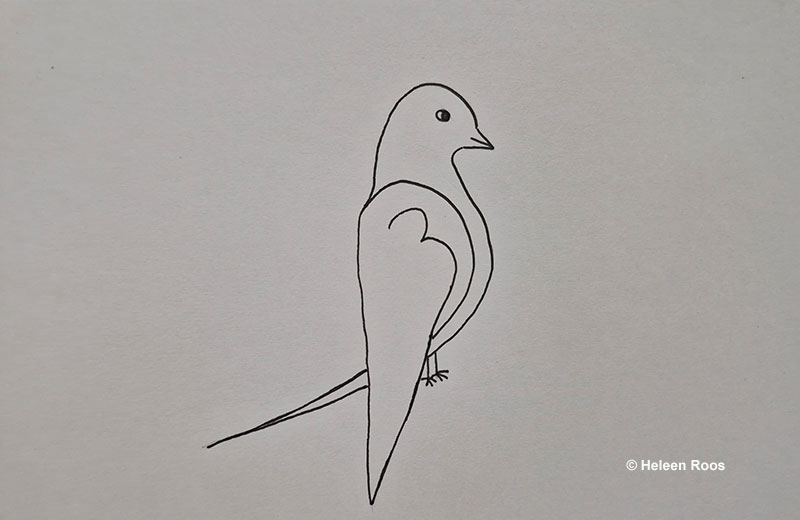
You can draw this sketch without having to lift your pencil from the paper. Well, almost.
- Start with the wing. Begin by drawing a curved shape resembling the number 3, but extend the bottom part further down to mark the tip of the wings.
- From the tip of the wings, draw a line up, stopping just above the top of the number 3.
- Now, from the end of this line start drawing a shape similar to a big number 2 that would surround most of the number 3 (except for roughly the last fourth of the wingtips). However, instead of drawing the base of the number 2, continue past the wings to create the tip of the tail. Now, you should have a complete sketch of the wings.
- Outline the body. From the tip of the tail, follow the outline of the number 2 back up to fully form the tail and belly. Stop where the bird’s throat and bill start.
- Now you can raise your pencil and bring it to where you think the top of the bill should be. Trace a curved line to the tip of the number 2 of the wings to create the bird’s head.
Draw the bill, the eye, and the legs. - Optional step. Erase the lines that go through the wings for a cleaner look and draw a line/branch on where the bird perches. You may add more details and color it how you see fit.
Feel free to play around with the proportions of the bird to make it similar to different species. Change the length, width, and/or angle of the tail, wings, belly, head, and bill.
Advanced Options & Different Species
Flying Birds
There are definitely some challenges to drawing bird in the move. What are the proportions? How do you add depth and depict movement? Here are some basic steps and tips. Follow along at your own pace and choose how detailed you want to make it.
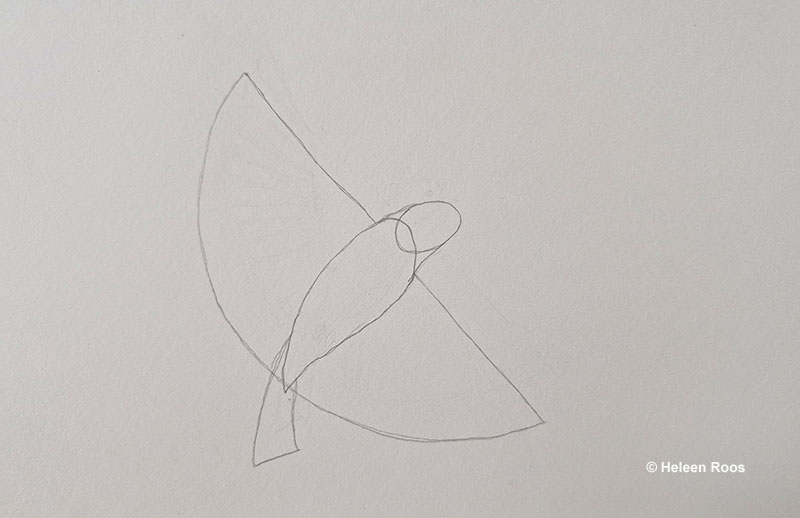
Start with basic shapes
To start things off, begin by drawing a semi-circle to outline the wings of the bird. In the middle of the semi-circle, draw a slender upside-down teardrop shape to represent the body.
Draw an oval for the head that slightly overlaps with the top of the bird’s body and connect the two to create a neck. From there, you can create a tail shape by drawing a rectangle that tapers towards the body.
Create a very basic sketch
Add wing linings by drawing a line from roughly the halfway point along the edge of the wings to the curve of the belly, forming a small triangle shape. Repeat on the other side.
Refine the wing shape by drawing a triangle from the outer corner of the wing lining to slightly above the wingtip and then connecting it to the rest of the wing. Erase some of the lower lines of the right wing to make it look like the flight feathers are not connected to the body. This adds realism and the feeling of movement.
Define the tail by adding creases or feather details.
Clean up your sketch by erasing any overlapping lines. At this point, you can draw the bill and the eye.
Add more detail
Now, this is where the fine details come into play. Add more volume and details to the wing linings. Make it uneven and add U-shaped lines to represent feathers. You can draw lines from the edge of the wings to the wing lining to indicate individual flight feathers.
To create depth and dimension, add a dotted arc over its belly and under its neck. Add more detail to the eye, its surroundings, and the bill. Draw legs and more creases to the tail.
As the last step, erase any unnecessary lines.
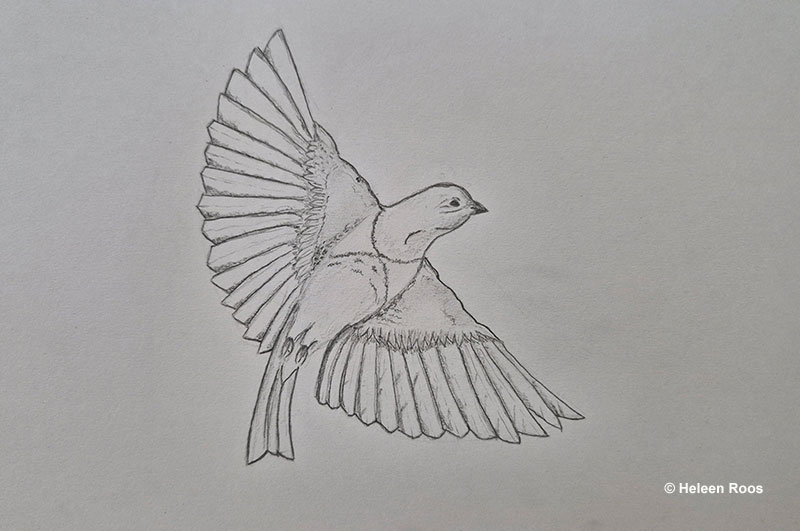
Make it life-like
How far you want to go with the details is completely up to you. Consider making the flight feathers uneven and adding shadows to the feathers and body to enhance realism. Use a marker or a pen to outline the drawing and erase the pencil sketch.
Doves
Just like with the previous sketch, start with basic shapes. Draw a small circle for the head and a larger oval for the torso.
Use slightly curved lines to connect the head to the body, creating a neck. Sketch out the outline of the tail, which might resemble an axe head lying on its side.
Now, you can add facial features. Draw the bill using two small triangles at the side of the head. Sketch an almond-shaped eye and fill it in.
Sketch out the wings – outline the wings extending from the back of the bird. Keep in mind that one is behind the body and the other wing.

To finish things off, add the legs and erase any guidelines that are no longer needed and define the outlines of the drawing. Add wing lining to the wing and feather ridges to the tail. Use slightly curved strokes to indicate individual feathers on the wings and tail.
Ducks
Initial sketch
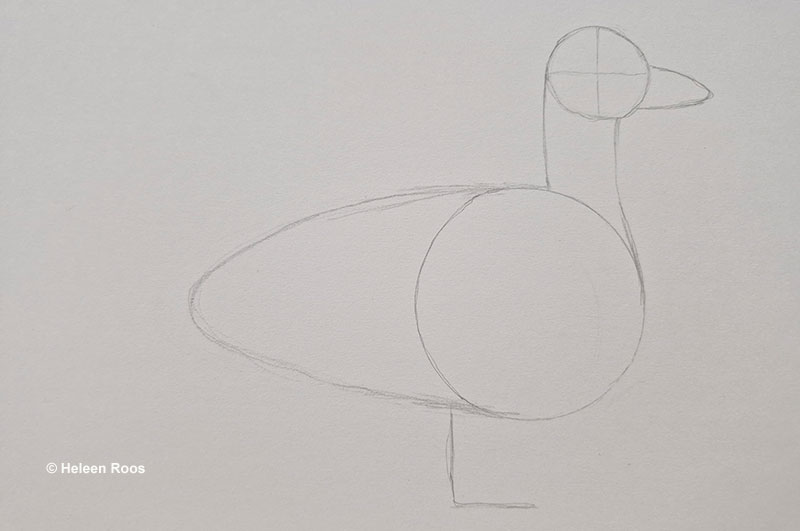
To start things off, sketch guidelines for the body. Begin by drawing a circle for the chest of the duck. Extend an arc to the left side of the circle to create the full body shape which should resemble the shape of an egg.
Above the body on the right side, draw a small circle for the head. Inside the head circle, draw a horizontal and vertical line to divide it into four equal parts, like a pizza, to guide the placement of facial features later. While you’re at it, you can add the rough shape of the beak.
Connect the head circle to the body with curved lines to create a neck.
Underneath the body, draw an L-shaped line as a guide for the duck’s feet. Start this line slightly left of where the arc meets the chest circle.
Defined sketch
On the upper right section of the head circle, draw an oval-shaped eye with pointed ends. Shade in a small circle inside the eye to create the pupil and leave a highlight at the top left corner. Lightly shade in the rest of the eye. Add a few more lines around the eyes for detail and depth.
From there, you can define the bill and use the initial arc as a guide. Start the bill around the tip of the horizontal line and end it in the middle of the lower right sector of the head circle. Shade in a small oval on the top side for the nostril and add details around the bill.
Moving on, you can start shaping the head and the body. Darken the outer portion of the head circle to define the head shape. Draw short strokes inside the head to create texture, depth, and dimension.
Outline the feet and legs. Use the L-shaped guide to draw the duck’s flat, webbed feet. Draw three individual toes and connect them with curved lines for the webbing. Also draw the visible portion of the other leg.
Use the top half of the body as a guide to draw the folded wing. Start the wing slightly below the point where the neck meets the body. The end of the wing sticks out and comes to a point. Use curved lines for the bottom portion.

To shape the body and neck, follow the initial guidelines to draw the neck and outline the body. Ensure the chest is prominent and that the outline doesn’t cut feet off.
You can add more definition to the tail too – draw curved and pointy shapes on the left side for the tail feathers. Use quick, short strokes throughout the tail to represent individual feathers.
Erase any remaining guidelines to clean up your drawing. Feel free to add more details and shading to give your drawing more dimension and texture. Consider the direction of your light source when shading to create a consistent and realistic appearance.
Eagles
Initial sketch
Start with basic shapes for guidelines – begin by drawing a diagonally placed bean-like shape for the eagle’s body. The upper left should be wider than the bottom right, suggesting a stocky chest.
Sketch the guide for the head. Draw a triangle shape with rounded edges for the head. Position the tip away from the body, with the bottom of the triangle slightly overlapping with the top of the body shape. Sketch the bill by drawing a pointed shape extending from the head.
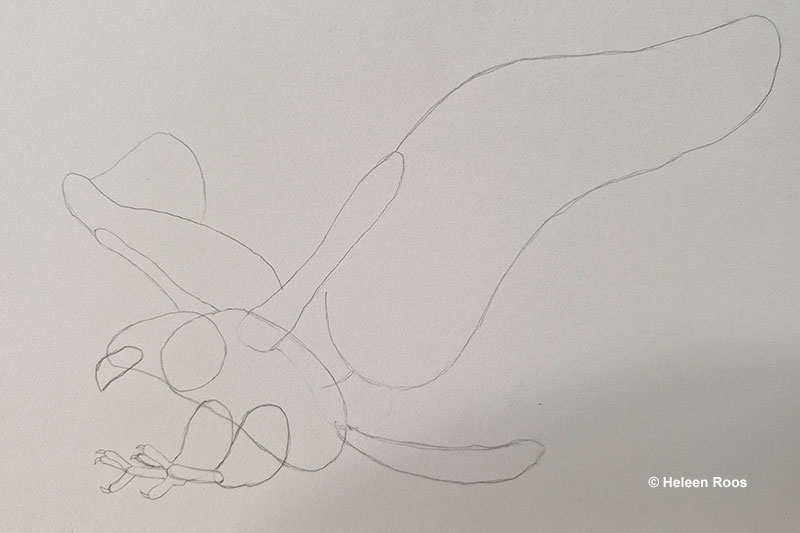
From there, you can add the rough shape of the tail and draw a fairly long, basic tail shape resembling that of a cat or dog, without adding detailed feathers yet.
Draw the legs and feet. Use small upright bean shapes for the legs, positioning them around the middle of the eagle’s body. Attach feet to the bottom of these shapes to define the talons.
Sketch the rough shape of the wings – draw two slender, almost oval shapes diagonally to the left and right of the body to represent the base of the wings. Add guidelines for the flight feathers using curved lines.
Define the eagle’s talons by adding sharp points to the feet. Now you have the basic guidelines down. On to the details!
Defined sketch
Refine the head and bill by adding more details. Detail the eye by drawing a pupil and iris. Add a sharp tip to the bill and draw a line to separate the upper and lower mandible. Create a brow ridge above the eye to depict the characteristic look of the eagles. Use jagged lines around the curve of the neck to suggest feathers.
Define the legs and feet by outlining them with more precision. Use jagged lines on the lower side of the legs to create a feathery appearance, leaving the upper side relatively smooth.

Add more details to the wings and tail. You can add wing linings using curved lines and draw individual flight feathers and tail feathers.
Now, you can detail the rest of the body. My favorite way of doing this was to add extra curved and straight lines here and there to create the impression of feathers.
To finish things off, erase the guidelines. Shade the eagle however you feel like.
Woodpeckers
For woodpeckers, study your reference image – take note of how the woodpecker is positioned on the tree trunk, the position of its body, and how it interacts with the tree.
From there, you can get an idea of how to sketch the basic guide. Start by drawing a small circle for the head and a larger oval below it for the body. Position the oval closer to the side where you plan to draw a tree trunk. Connect the head and body with curved lines to form the neck. Draw a line from the head circle to mark the direction of the bill.
Define the head shape and draw the woodpecker’s bill, including a line for the nostril. After doing this, it’s a bit easier to sketch the body contours. Extend the neck and body lines to create the back of the head, neck, and body.
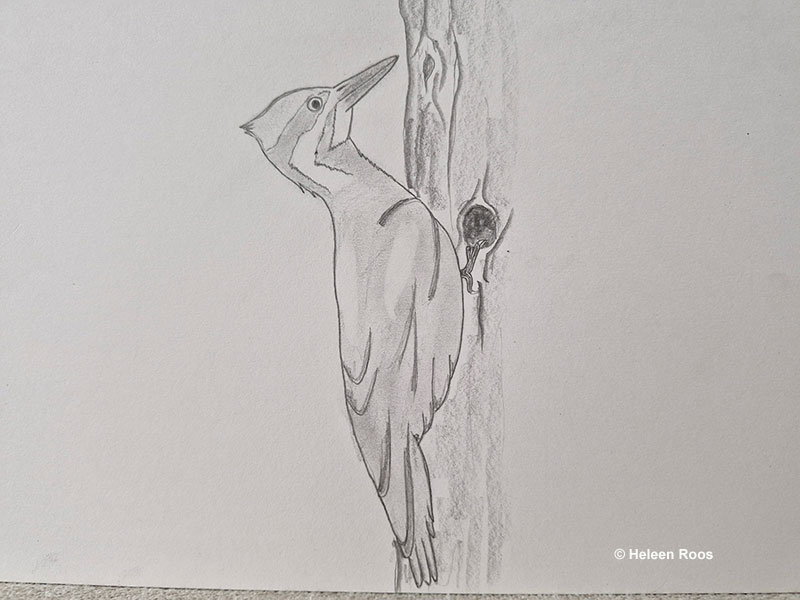
Draw the distinctive head pattern of the woodpecker, such as stripes, markings, or spots around the face and eyes. Draw a detailed eye. I chose the Pileated Woodpecker, but there are plenty of other options.
Continue by sketching out the front of the woodpecker’s body, including the neck, chest, and belly. Extend the line further down and add some feather detailing to indicate wings and the outer edge of the tail.
From there, you can sketch the initial lines of the tree trunk.
Draw the rest of the woodpecker’s wing and tail by adding detailed outlines of individual feathers.
Finish the tree trunk and sketch the feet grabbing onto the trunk. Erase guidelines, and feel free to add more shadowing and details or color.
Owls
To draw an owl, start with basic shapes for guidelines. Draw a small circle for the head and a rectangular oval shape right underneath, slightly overlapping with the head circle. Divide the head circle into four ‘pie’ slices. These slices will guide you on where to add facial features and details.
Draw the hooked bill with the upper arc surrounding the center of the pie (where the ‘x’ is).
After this, you can define the face disc. Draw diagonal lines extending upward from the left and right side of the base of the bill to indicate the face disc. Continue drawing from the diagonal lines around the head to fully form it.
Place ovals for the eyes on each side of the bill, aligned along the horizontal line within the face disc area. Outline the eyes, draw pupils, and lightly shade the iris, leaving white spaces for highlights to add realism and depth.

Moving on, define the outline of the head. Draw ear tufts if your desired species has them.
Continue the body outline – extend the body outline from the head, adding jagged lines along the belly to indicate feathers. Show the wings on the side, using similar jagged lines for texture.
Draw the legs and feet – they are usually a bit leaner, but I couldn’t get them quite right this time. You can separate the legs from the body with jagged lines to indicate feathers.
To finish, detail the drawing; shade it, add more detailed feather clumps, etc.
Hummingbirds
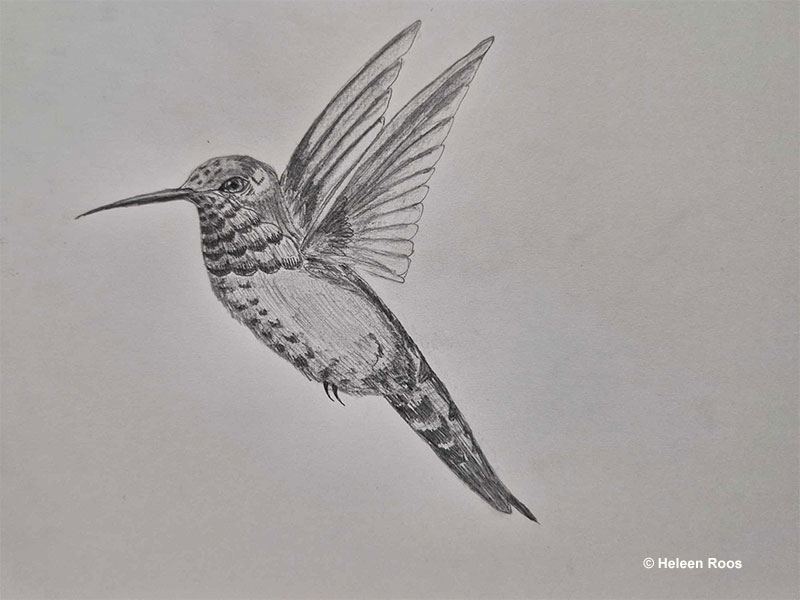
Hummingbirds are nimble creatures and this comes out in their body shape as well. As usual, start with the outlines – draw the rough outline of the head, neck, and torso of the bird.
From there, you can add the bill, eye, and outline of the tail with basic shapes.
Moving on to the wings, sketch the outlines, positioning them appropriately on the bird’s body. Once you’re happy with the shape and position, draw them over however you’d like.
This design includes more details, but start with the bill and tail. Incorporate specific features such as texture, shape, shade, and distinctive markings to add more definition. From there, you can go back to the wings – draw individual flight feathers and detail the wing linings. Pay attention to the shape of the feathers and the overall placement.
You can also add face and throat patterns to give the drawing more character.
To finish things off, you can add shadows and textures. Enhance the drawing by shading areas such as the belly, bottom of the tail, and wing linings to create depth. Use individual strokes to create texture.
See more: Hummingbird drawing guide (by levels of difficulty)
What To Keep In Mind
- Begin your drawing with light pencil strokes. This makes it easier to make corrections and adjustments as needed.
- Use reference images for inspiration. Study the details of their feathers, wings, bills, and other unique features that characterize different species. It might also prove useful to observe them in nature. Pay attention to their movements and postures.
- Start by sketching basic shapes and lines as guidelines for your bird drawing. Focus on proportions. Use circles, ovals, triangles, and lines to outline the body, head, wings, and tail. This helps ensure proper proportions and positioning.
- Birds have intricate feather patterns that vary by species. Take time to study how feathers overlap and create texture. Use different pencil strokes to mimic feather details, such as soft curves or fine lines.
- Use layering for depth. Build layers of shading and texture to add dimension to your drawings. Start with light shading and gradually darken areas to create realistic contrasts.
- Don’t be afraid to make mistakes and fail! It is a part of the learning process and every attempt, successful or not, contributes to your growth as an artist.